


Origin and History
Graduation celebrations trace back centuries, but the custom‑made graduation cake is a comparatively modern tribute to academic achievement. This vanilla layer cake evolves from classic American bakery style—tall, tender, butter‑rich layers—while borrowing ceremonial symbols (mortarboard and diploma) that date to medieval universities. By pairing timeless vanilla crumb with contemporary buttercream artistry, the cake captures both tradition and forward momentum.
Unique Ingredients and Flavors
Beyond the fragrant vanilla base, the recipe’s charm lies in its dual‑tone buttercream. Pure‑white swirls evoke fresh parchment, while gold‑tinted accents add festive luxury. Black fondant introduces a dramatic visual contrast, and optional edible pearls lend a subtle crunch. The overall profile remains a balance of buttery richness, mellow sweetness, and a hint of salt that keeps each bite engaging.
Baked to Share
Designed for milestone gatherings, this cake stands stately on the dessert table yet slices cleanly into twelve generous portions—enough for classmates, family, and mentors. Its showpiece décor invites photographs, speeches, and toasts, making the bake as much a centerpiece as the diploma itself.

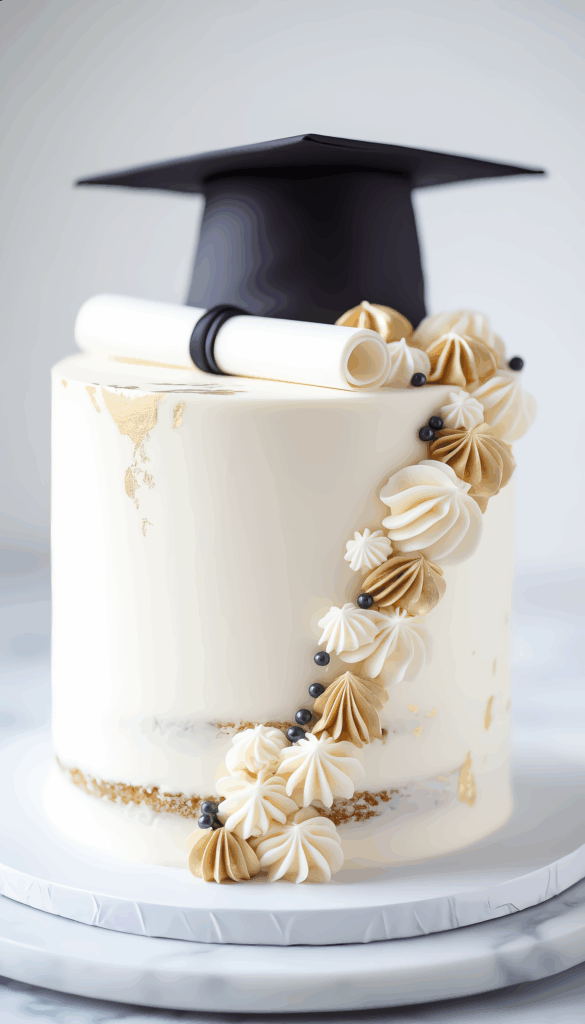
Graduation Cap Vanilla Cake with Buttercream Swirls
Description
Moist vanilla layers meet lavish white and gold buttercream in this festive graduation cake. Step‑by‑step instructions guide you from batter to breathtaking décor, ensuring party‑ready results.
Ingredients for Graduation Cap Vanilla Cake with Buttercream Swirls
For the Basement of Cake
For the Buttercream
Decoration
Instructions
Preparing the Cake Pans
-
Grease and Line the Pans
Lightly butter or spray two 8‑inch round cake pans. Line the bases with parchment circles and dust the sides with flour.
Proper preparation prevents sticking and ensures clean layer release.
Mixing the Batter
-
Cream Butter and Sugar
In a stand mixer fitted with paddle, beat softened butter and granulated sugar on medium speed until pale and fluffy, about 3 minutes.
Adequate creaming creates tiny air pockets for a lighter crumb. -
Add Eggs and Vanilla
Beat in eggs one at a time, scraping bowl between additions. Mix in vanilla extract until incorporated.
Adding eggs gradually prevents batter separation. -
Incorporate Dry Ingredients and Milk
Whisk flour, baking powder, and salt in a separate bowl. With mixer on low, alternate adding dry mixture and milk in three additions, ending with dry. Mix just until no streaks remain.
Over‑mixing at this stage can toughen the cake.
Baking the Cakes
-
Bake
Divide batter evenly between prepared pans and smooth tops. Bake at 350°F for 28‑32 minutes or until a toothpick inserted at center comes out clean.
Rotate pans halfway for even baking if your oven has hot spots. -
Cool
Let cakes cool in pans 10 minutes, then invert onto wire racks. Peel parchment and cool completely.
Assembling warm layers will melt buttercream.
Making the Buttercream
-
Whip Butter
Beat softened butter on medium‑high until creamy and lightened, 2 minutes.
Starting with airy butter shortens total whipping time. -
Add Sugar, Vanilla, and Cream
Gradually sift in powdered sugar, beating on low to combine. Blend in vanilla. Add heavy cream a tablespoon at a time until spreadable. Increase speed and whip 2 minutes.
Too much cream early can cause splitting; add slowly. -
Tint a Portion Gold
Transfer 1 cup buttercream to a small bowl. Tint with gold gel food coloring until desired hue is reached.
Gel colors are potent—add drop by drop.
Assembling the Cake
-
Level and Fill
Trim domes from cake layers if needed. Place first layer on a turntable. Spread 3/4 cup white buttercream evenly. Top with second layer.
A large offset spatula ensures an even filling thickness. -
Crumb Coat and Chill
Apply a thin layer of white buttercream over entire cake to seal crumbs. Refrigerate 20 minutes.
Chilling firms butter for a flawless final coat. -
Final Coat and Swirls
Frost cake smoothly with remaining white buttercream. Using a star tip, pipe abundant white rosettes around base and randomly up sides. Pipe additional swirls of gold buttercream between the white accents.
Vary swirl sizes for visual depth.
Decorating the Cake
-
Craft the Mortarboard
Roll black fondant to 1/8‑inch thickness. Cut a 4‑inch square for the board and a 1 1/2‑inch circle for the cap base. Attach pieces with water or edible glue; add a gold luster dust tassel.
Allow fondant to dry slightly so shapes hold. -
Make the Diploma
Roll white fondant into a 3‑inch rectangle. Roll up and secure with a thin band of gold‑tinted fondant.
A light brush of water helps fondant stick to itself. -
Place Toppers and Finishing Touches
Set mortarboard and diploma slightly off center atop cake. Sprinkle edible black pearls and gold sprinkles around buttercream swirls.
Position toppers gently—pressing too firmly can crush swirls. -
Chill the Final Cake
Chill the fully assembled cake for at least one hour.
At the venue, keep the cake shaded and display it no more than thirty minutes before cutting to preserve the buttercream’s structure.
Note
- Ensure all refrigerated ingredients reach room temperature to achieve a smooth batter and buttercream.
- Use gel food coloring sparingly; buttercream deepens in color as it sits.
- The crumb‑coat chill is critical for crisp edges—do not skip.
- Fondant decorations can be made a day in advance and stored loosely covered at room temperature.
- For a taller presentation, bake the batter in three 6‑inch pans and stack as a triple‑layer cake.
- Leftovers keep well wrapped and refrigerated for up to 4 days; serve slices at room temperature for best texture.
- To freeze layers, wrap cooled cakes in plastic and foil; freeze up to 2 months. Thaw overnight in the fridge before frosting.
- Substitute plant‑based butter and milk for a dairy‑free version; textures may vary slightly.
- A pinch of salt in both cake and frosting prevents cloying sweetness.
- Gold buttercream accents can be intensified by brushing with edible gold luster dust after piping.


This Graduation Cap Vanilla Cake with Buttercream Swirls is a stunning tribute to academic achievement. The moist vanilla layers combined with elegant white and gold buttercream swirls create a visually appealing centerpiece. The addition of a fondant mortarboard and diploma adds a personalized touch, making it perfect for celebrating graduates. The balance of buttery richness and mellow sweetness ensures that it tastes as delightful as it looks. A truly memorable dessert for any graduation celebration. Buttercream is my favorite! Debra
This cake is an absolute showstopper! The way you’ve combined the classic vanilla flavor with those gorgeous white and gold buttercream swirls is so festive and elegant—perfect for a graduation celebration. I really appreciate the detailed step-by-step instructions, especially for the fondant mortarboard and diploma; it makes the process feel way less intimidating. The symbolism you wove in, tying the cake to the journey of graduation, adds such a heartfelt touch.
Quick question: Any tips for beginners to get those buttercream swirls looking so polished? I’m inspired to try this for my cousin’s graduation! Thanks for sharing such a creative recipe!
This cake is such a beautiful metaphor for graduation itself—layered with effort, topped with pride, and meant to be shared with those who’ve supported the journey. It’s inspiring to see how something as ephemeral as dessert can carry such rich symbolism. I guess the real question is….Can I pull it off LOL!
I love this cake. My thought is that it may be too hard for me to put together and look like the picture. The recipe for the cake looks delicious and I would like to try it, but I’m not sure my skills are good enought to have the appearance looks good. Do you find that it takes a lot of practice to make cakes looks so appealing? Maybe you have “beginner” cakes that are easier to make presentable, and then work my way up?
This looks absolutely beautiful and sounds just as delicious! I used to make decorative cakes too and have done a few graduation-themed ones, so I really appreciate the detail and care you put into this.
The buttercream swirls are so clean and festive. I love how they elevate the design without being over the top. Vanilla cake is always a crowd-pleaser. How did you help the cap topper hold its shape during transport? They always gave me so much trouble during the transportation phase which is why I’m asking.
This cake looks absolutely stunning—such a creative and festive way to celebrate a graduation! I love how the buttercream swirls add a touch of elegance while still keeping it fun and inviting.
I’ve tried making themed cakes for special occasions before, and getting the design to look clean and professional while still being homemade is always the biggest challenge for me. Your step-by-step breakdown really helps demystify that process.
In my opinion, cakes like this don’t just taste good—they make the moment feel even more special. Definitely bookmarking this for inspiration when the next graduation rolls around in my family!
First of all, this is actually cruel, to have to sit here and read this recipe and have my mouth watering so much that I can taste it, without ACTUALLY being able to taste it! That is one fantastic recipe I am going to make! I love to cook. I have had no formal training, self taught but I think I can do it. I love buttercream icing and now I know how to make it. I will be making This!!
Is this recipe something that was passed down to you?
Does this cake stand up pretty good in the south in high heat and humidity if it sat out say at an outdoor graduation party?
Would it need to be kept in doors?
This recipe looks and sounds delicious. I just tried a really sweet and refreshing piece of cheesecake the other day. It was a good experience. It was a sampled moment but as for this cake…
It looks really time consuming to make but with following instructions things get made with ease. Most I’ve made was a frozen smoothie. This looks good enough to actually try baking.
I see this recipe trending if it hasn’t already yet. There’s gonna be plenty of people looking to solidify their celebration with a cake.
Wow, I’m still drooling!
This recipe is great. I gained 5 pounds reading it! I’m going to make this, especially the Buttercream. There are other recipes I could add that to. I’m normally a sweets eater, but I could make an exception here!
Special cakes for special occasions are always the best!