
Origin and History
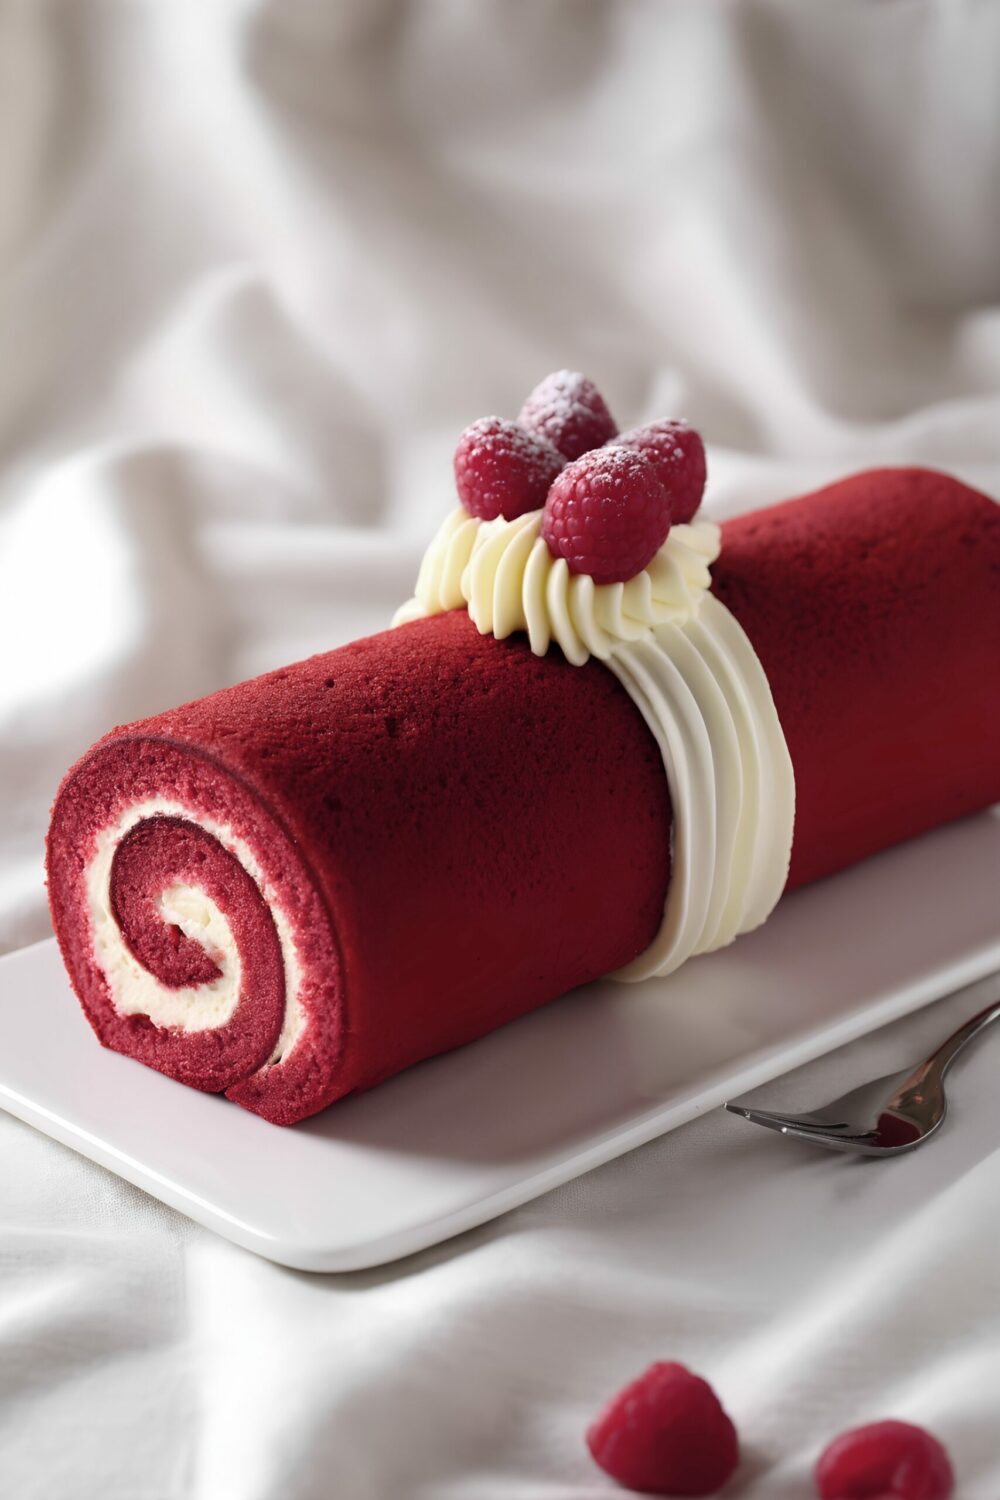
The rolled sponge cake, or “roulade,” has long symbolized celebration across European patisseries. In this crimson interpretation, classic American red velvet meets the ceremonial parchment shape of a diploma—an edible homage to academic milestones that gained popularity at university commencements in the early 2000s. This version embraces natural beet powder for its rosy hue, aligning with modern preferences for plant‑based colorants.
Unique Ingredients and Flavors
Cocoa‑kissed red velvet delivers its signature hint of chocolate while beet powder lends a deep rose tone without synthetic dyes. Tangy cream‑cheese frosting balances sweetness, and powdered‑sugar raspberries gleam like a wax signet sealing an official decree.
Baked to Share
Presented as a striking 14‑inch scroll, each slice reveals pristine cream‑cheese spirals—a visual and gustatory reward ideal for graduations, anniversaries, or any festivity that calls for pomp and sweet circumstance.


Red Velvet Diploma Roll Cake with Cream Cheese Ribbons
Description
This impressive roll cake pairs a tender crimson sponge—naturally tinted with beet powder—with airy cream‑cheese filling, then finishes with decorative white ribbons and a raspberry “wax seal.” A photogenic centerpiece ready for honors night.
Ingredients for Red Velvet Diploma Roll Cake with Cream Cheese Ribbons
Basement of Roll Batter
Cream‑Cheese Filling
Decoration
Instructions
Preparing the Dry and Wet Components
-
Sift Dry Ingredients
Whisk together cake flour, cocoa powder, beet powder, baking powder, baking soda, and salt in a medium bowl.
Sifting twice prevents streaks and distributes beet pigment evenly. -
Whip Egg Yolks and Buttermilk
In a separate large bowl, beat egg yolks with half of the granulated sugar until pale and ribbon‑thick. Blend in buttermilk, vegetable oil, and vanilla extract.
Whip until the yolk mixture leaves thick ribbons when lifted with the whisk—this aeration sets the stage for a light, pliable sponge. -
Aerate Egg Whites
Using clean beaters, whip egg whites to soft peaks; sprinkle in remaining sugar and continue beating to glossy medium‑stiff peaks.
Over‑whipped whites become dry and hard to fold—aim for marshmallow texture.
Combining and Baking the Sponge
-
Fold Batter
Gently fold one‑third of the whipped whites into the yolk mixture to lighten. Add remaining whites along with the sifted dry ingredients, folding until just combined.
A light hand preserves air for a tender crumb. The batter will appear pale rose; the crimson hue intensifies during baking. -
Prepare Pan and Bake
Line an 11×17‑inch jelly‑roll pan with parchment; lightly grease. Spread batter evenly to corners. Bake at 350°F for 10–15 minutes until the top springs back when pressed.
Keep baking time at the shorter end (10 min) and test early; avoid over‑baking to keep the sponge pliable for rolling. -
Condition the Sponge
Invert the hot cake onto a fresh parchment sheet. Peel off the baked liner. Cover with a barely damp towel for 2 minutes to trap steam, then remove towel.
This “steam‑press” keeps edges from cracking during the roll.
Making the Cream Cheese Filling
-
Blend the Filling
Beat softened cream cheese and butter until creamy. Gradually add powdered sugar, vanilla extract, and salt; whip until light and spreadable. You should have roughly 3½ cups frosting.
Chill briefly if frosting becomes too soft. -
Reserve & Divide
Scoop out about ¾ cup frosting and transfer to a piping bag fitted with a small star tip; refrigerate until needed for exterior ribbons.
Chilling the reserved piping batch keeps the ridges neat. If frosting softens, blitz it in the fridge for 10 minutes before using.
Filling, Rolling, and Setting
-
Spread the Cream‑Cheese Filling
Using an offset spatula, smooth a thin, even layer of cream‑cheese frosting across the entire sponge, maintaining a thickness of roughly 1⁄4 inch. Leave the final 1‑inch strip along the far long edge bare so the roll can seal neatly when finished.
Even thickness ensures a symmetrical spiral when sliced. Coating the full surface creates a continuous white spiral that reaches the outer sides of each slice, while the un‑iced strip prevents excess filling from squeezing out at the seam. -
Roll the Diploma
Starting from a long edge, roll the cake away from you, keeping pressure even for a tight scroll. Place seam‑side down on a platter; refrigerate 30 minutes to set.
Chilling prevents the roll from unfurling during decoration.
Decorating and Presentation
-
Add Exterior Ribbons
Fit a piping bag with a small star tip and pipe a wide strip of cream cheese in the center around the top.
Practice pressure on parchment first for consistent piping. -
Affix Raspberry Signet
At the precise midpoint, pipe a 2‑inch rosette as a base. Cluster raspberries upright to form a sort of “wax seal.” Dust berries lightly with powdered sugar.
Dust only the fruit so the cream‑cheese ribbons remain crisp white.
Chilling & Serving
-
Chill and Slice
Place the decorated roll in the refrigerator for at least 1 hour to allow the cream‑cheese ribbons to set fully. Slice with a warm serrated knife, wiping the blade between cuts, and bring slices to room temperature for 10 minutes before serving.
Proper chilling ensures clean, elegant spirals and softens flavors once brought to serving temperature.
Note
- Beet powder offers a natural hue; choose a bright, fine‑ground variety for best color.
- For every additional ½ Tbsp beet powder you decide to add, stir 1–2 tsp extra buttermilk into the yolk mixture to maintain the original batter thickness.
- Cake flour gives the lightest texture; all‑purpose can substitute but will be denser.
- Chill the filled roll before slicing for sharp spirals.
- Serve slices with extra raspberries or a drizzle of raspberry coulis.
- Store refrigerated in an airtight container up to 3 days; bring to room temperature 15 minutes before serving.
- To freeze, wrap the un‑decorated roll tightly in plastic and foil for up to 1 month; thaw overnight in the fridge, then decorate.
- Substitute strawberries or blackberries when raspberries are out of season.
- Add 1 tbsp cocoa nibs to the filling for a subtle crunch.
- Weigh flour for precision—92 g equals 3/4 cup.
- For a gluten‑free version, swap cake flour with a 1:1 gluten‑free baking blend.